
Big Girl Bed and Nightstand
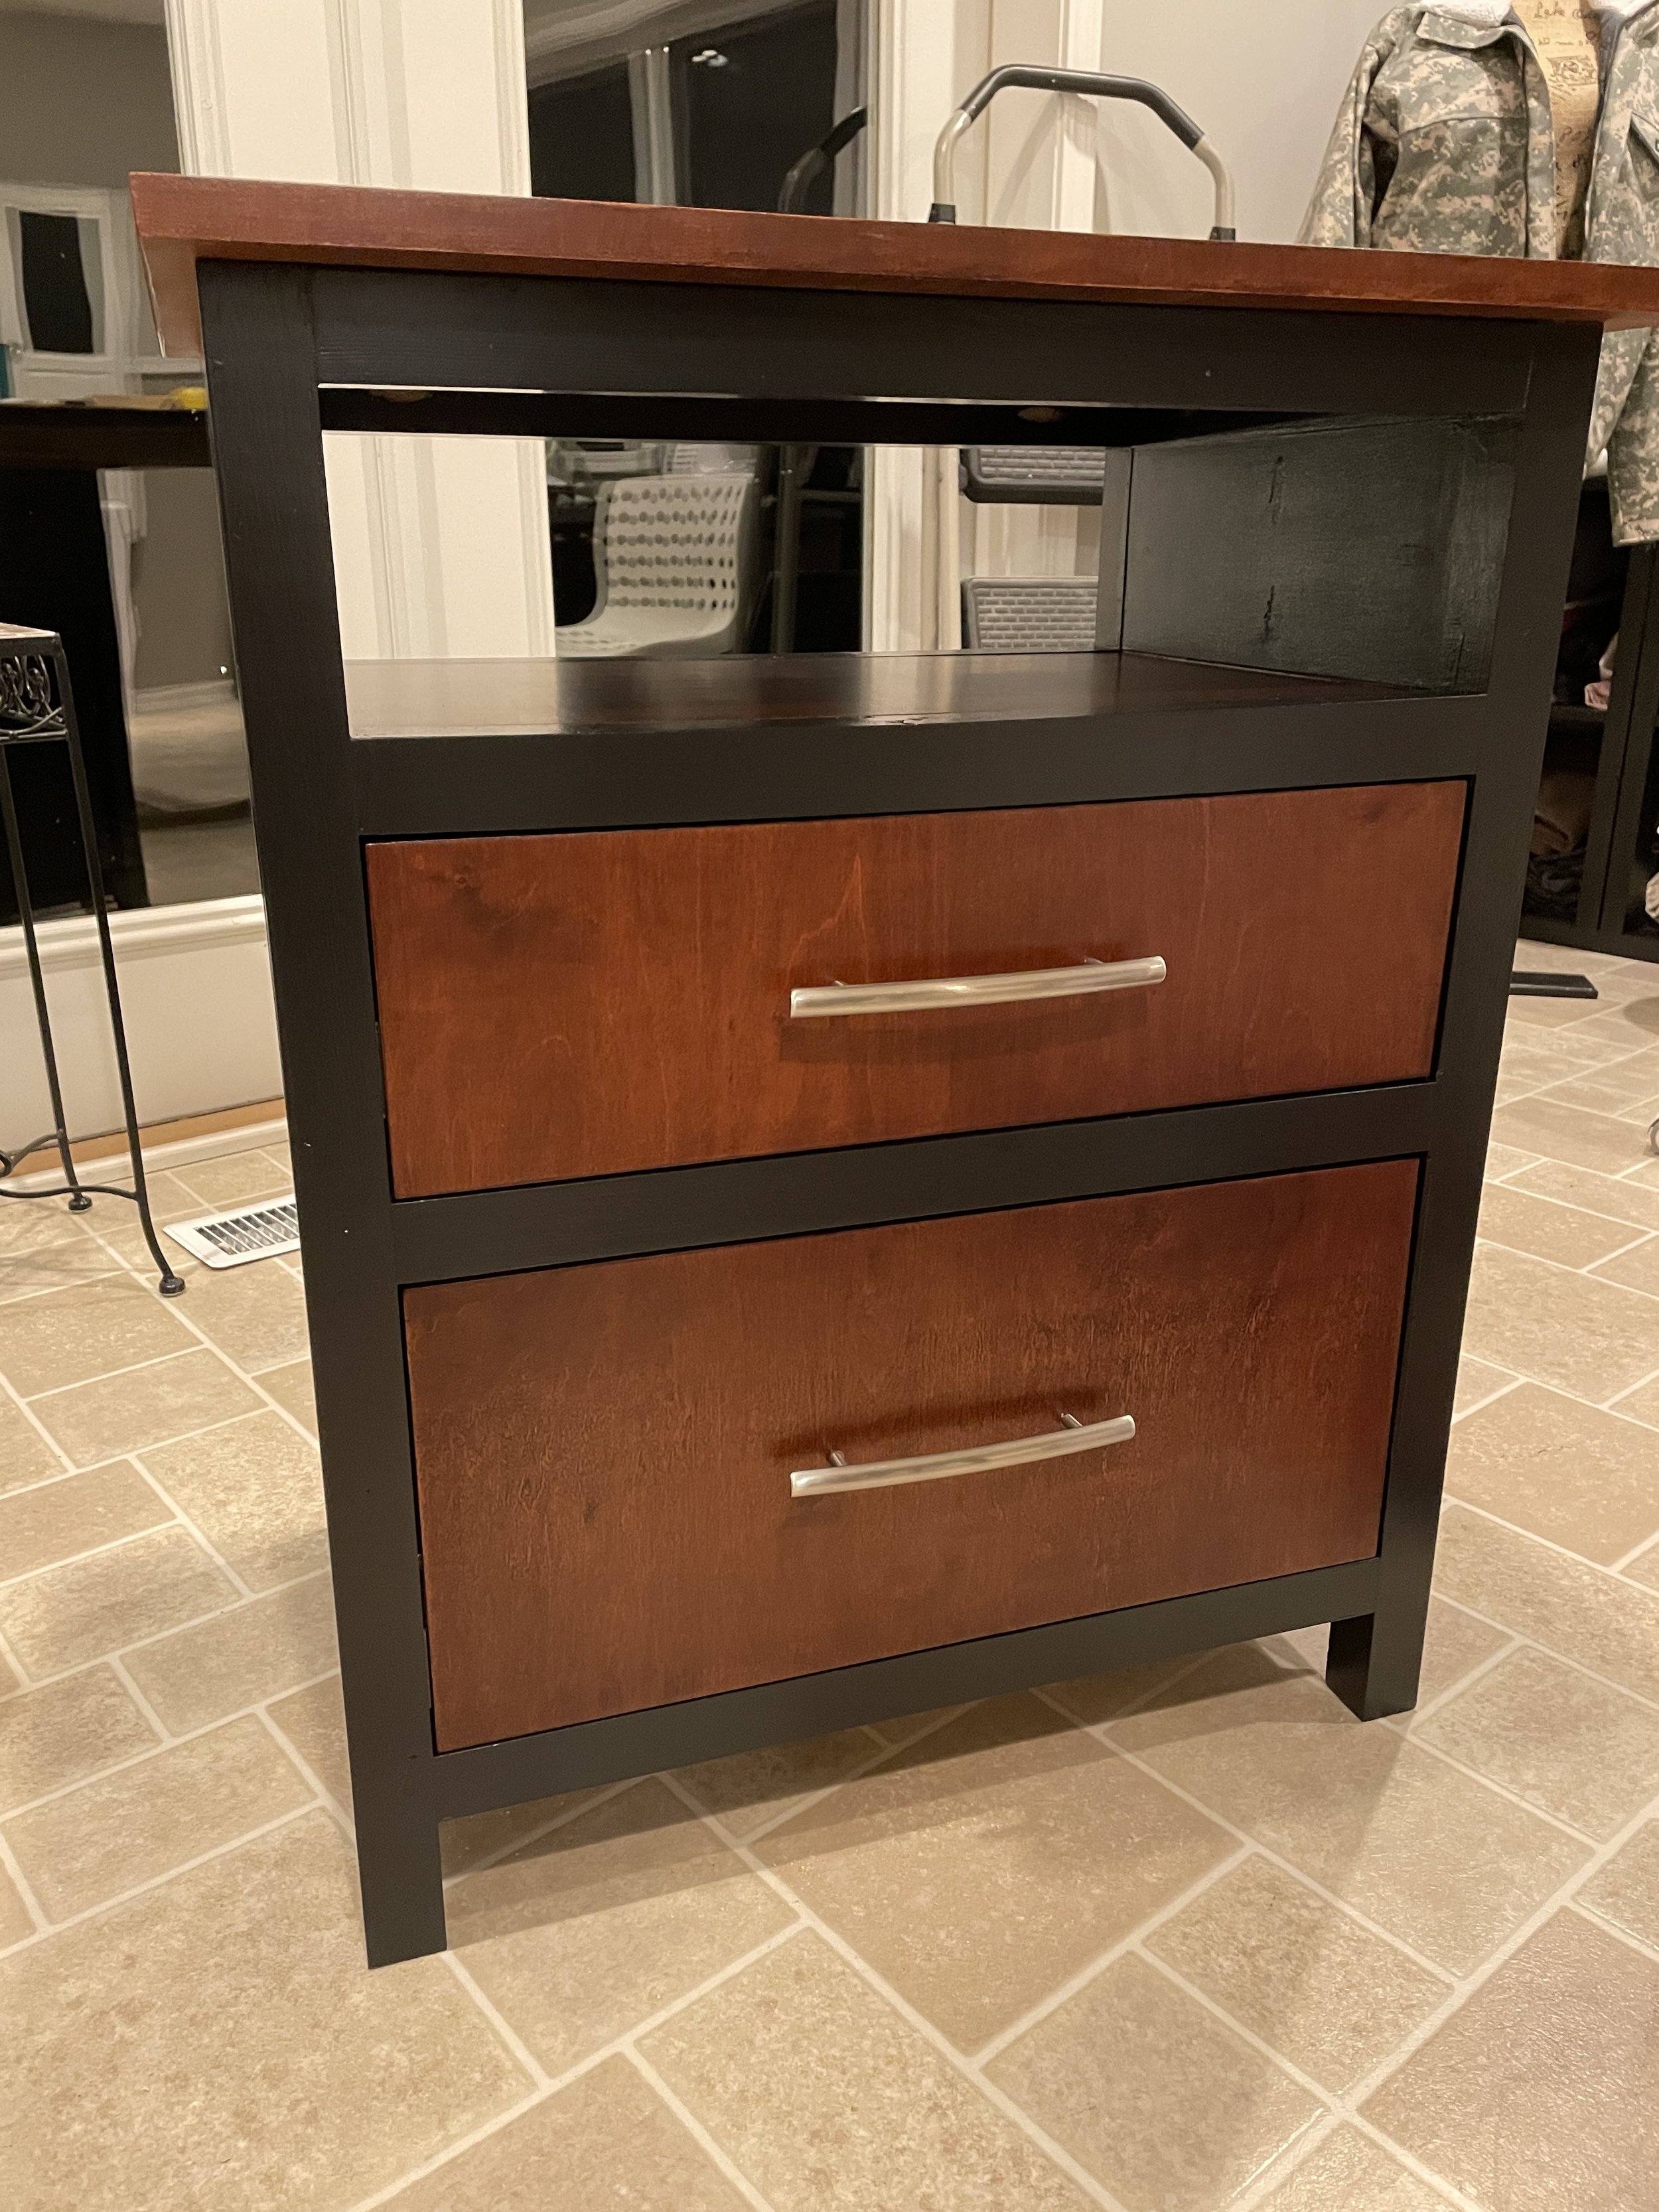
/Last April, I decided to make myself a new nightstand because the one I’ve been using for longer than I’d like to admit doesn’t really match my furniture and is not-even-Ikea-crappy-flatpack junk with legs that fall off if you try to move it. The only thing it had going for it was that it was the perfect height.
I designed what I wanted in Sketchup and this was very helpful in visualizing what this thing would look like and I could also decide how things would be joined together. I also took another shot at making drawers since my first attempt was not great.

I wanted this to not be too matchy-matchy with my dressers, so I decided on a black frame with stained wood drawer fronts, shelf and top to match my dressers and I think it turned out pretty sharp! I spent a lot of time trying to figure out how to match the color of the wood of my dressers and I really lucked out and found the perfect stain from General Finishes.
Side note - General Finishes is apparently based like 10 miles from me, but I cannot find anywhere in my immediate area to buy it, so I had to order it on Amazon, which is super dumb since I could have walked to their factory faster. Whatever.
Despite my annoyance that I can’t buy this at a store near me, I am IN LOVE with this stain. I used their Water Based Wood Stain in Hickory and let me tell you why I love it:
It doesn’t smell like oil stain does, where you bring the piece inside and your house stinks like stain for days.
Soap and water cleanup.
NOT FLAMMABLE.
Color is very rich and it’s super easy to apply.
I am so happy with how this turned out. I used maple plywood for the top, shelf and drawer fronts and I cannot believe that this stain basically was a dead on match to my existing furniture - right out of the can, no mixing or layering required. I used polycrylic as the top coat (since that’s what I had in my shop) and it really looks good.
And this time I totally nailed the drawers. They fit perfectly and I didn’t have to do any crazy hacky adjustments to make them work.


Since the nightstand went so well, I decided to treat myself to a “big girl bed”. I’ve just never had a bed with an actual headboard and footboard. So, why the hell not? I toyed around with the idea of a platform bed with drawers underneath but the reality is that I just don’t have the need for that much storage. Instead, I figured I’d do a slat system so I could ditch the base (similar to a box spring) my mattress currently sits on. Spoiler Alert: this approach changed later.
I decided to do the same style as the nightstand - the frame in black with just a couple of stained accents to complement the dressers. I watched some videos of other DIYers and how they did theirs, which was helpful to give me some ideas of what I’d want to do (and what I definitely did not want to do). I designed it in SketchUp and made it exactly how I wanted it.
I started off my measuring how high my bed currently sits. I like it where it is, so I wanted to make sure that what I built would match the current height. I took some measurements of the mattress itself and used that as the starting point to figure out the dimensions for everything else.
I measured on the wall to determine how tall I wanted the headboard to be. I spent an inordinate amount of time deciding on the height of the footboard only to ultimately decide against a high footboard since I realized that I do sometimes sit on the end of my bed to put socks on or whatever, and I can’t be bothered to adjust my habits and move that operation to the side.
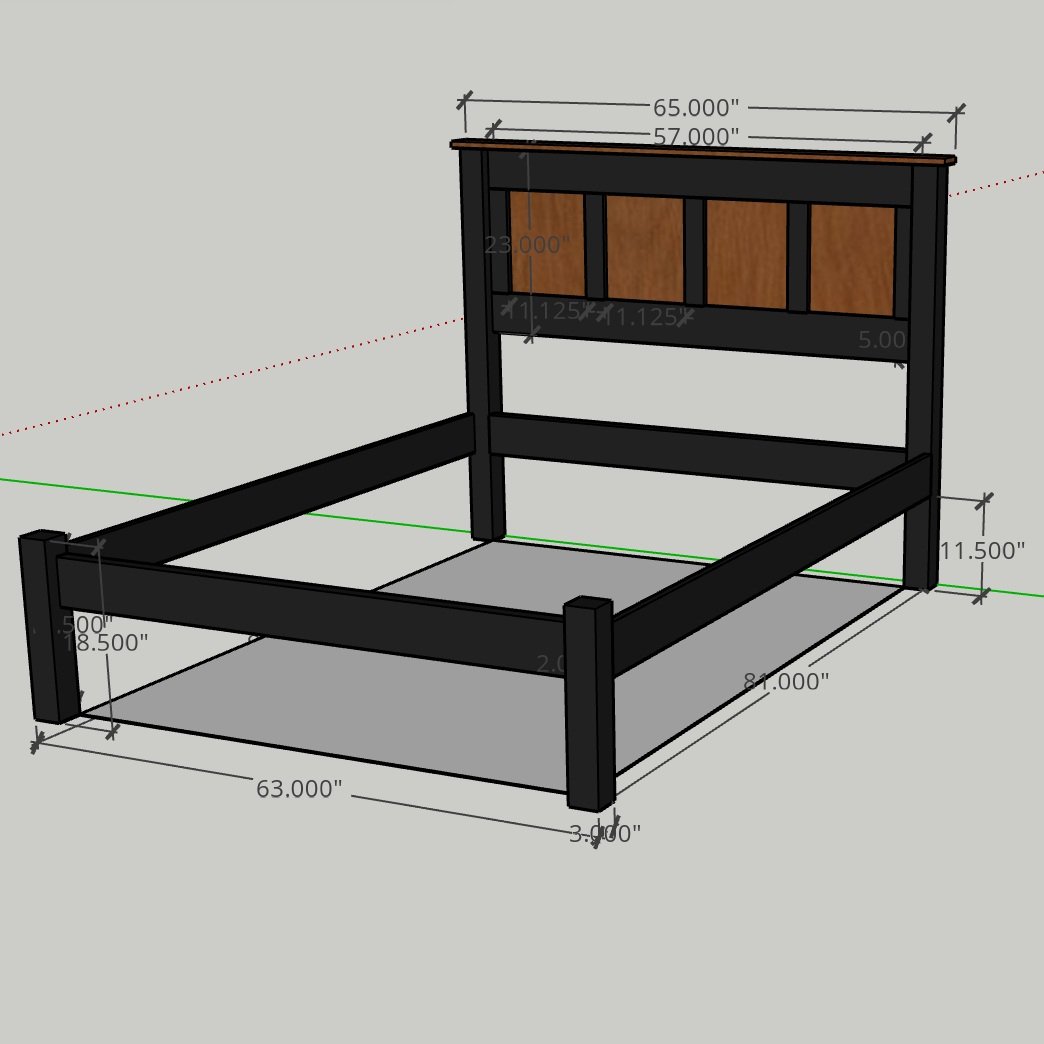
Once I got it drawn up in SketchUp, triple checked my measurements, put together a cut list and wrote up the plan of attack to build it, I got the lumber and started on it.
I rough cut my lumber to size for all of the parts and I used pine 2x4s and 2x6s for this because most of it is going to be painted anyway. I used maple plywood for the headboard panel and a piece of maple 1x4 for the headboard top piece. Those would be stained anyway so I didn’t want to spend money on really nice wood only to hide it behind paint and stain.
After gluing up the legs and getting them to their final dimensions (about 3.5x3.5), I attempted a chamfer around the bottom of the legs but my routering skills need work. So, I decided to turn that into a “design feature” and used a chisel to carefully carve the corners to match my royal fuckup.
The “back” side of the headboard will be against the wall, so I pocket screwed everything - the maple plywood to the top/bottom rails and the rails/plywood into the legs at the sides. I spent a lot of time making sure the offsets were correct and it came together nicely. Once the headboard main panel was attached to the legs, I added some 1x3” stiles painted black to break up the maple panel into sections.
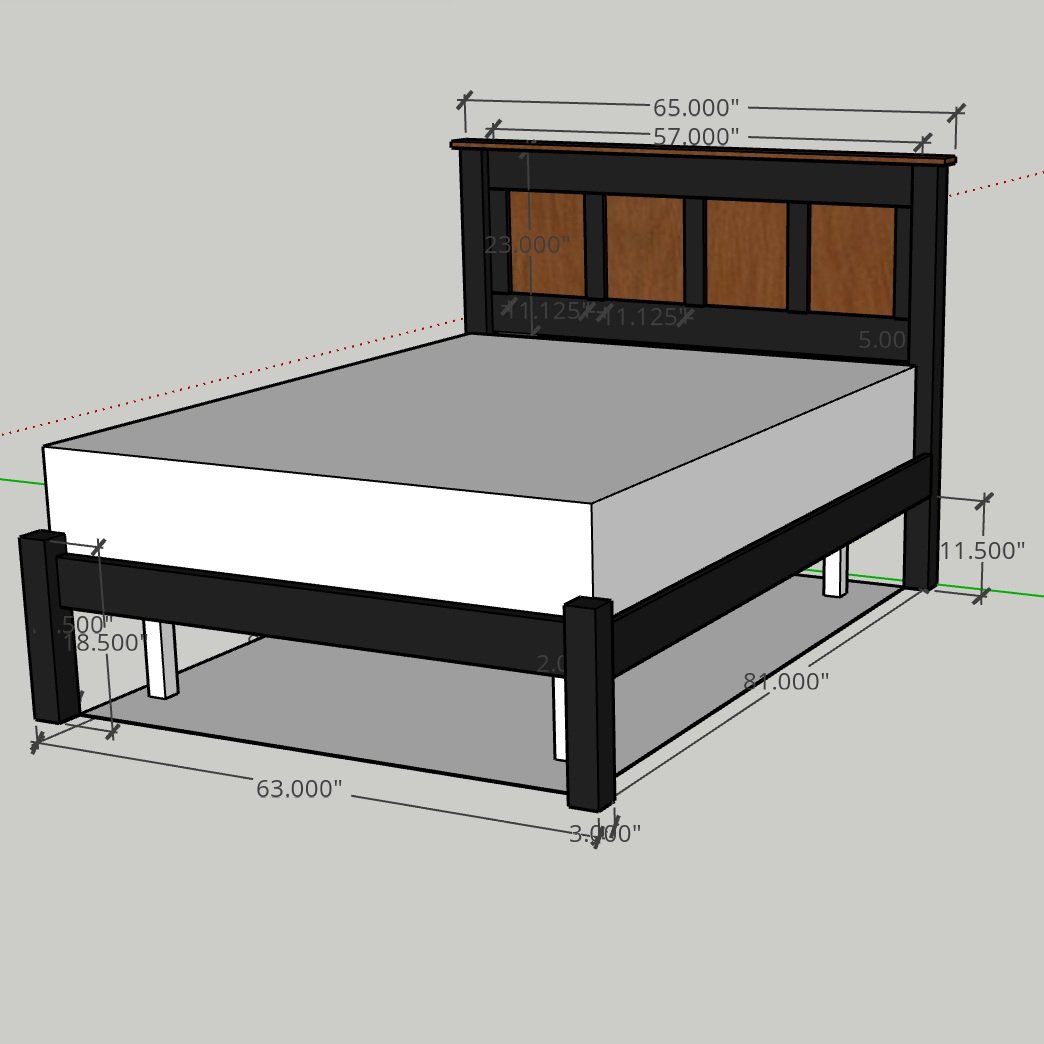
Truth be told, I had the lumber sitting around for a while and the side rails developed a twist that I noticed only when I went to attach them to the legs (that’s the price of playing construction pine roulette). And by twist, I’m talking over 1” of twist corner to corner - which I immediately decided was not worth the effort to attempt to remedy. So, I thought I’d just attach the headboard to my existing metal bed frame, forgo the footboard and call it done.
I got the headboard moved upstairs in preparation to attach it to my frame.
Then stuff happened, and I decided I needed to get me one of those adjustable bases for my bed so I could elevate my sleeping position. So, I got that set up and thought maybe I could get back to this whole bed concept since these bases are generally made to fit inside a “real” bed frame. I took some measurements and since I needed to make some new side rails anyway, I picked up some 1x6s (this time I used hardwood instead of pine) to make some new side rails. Since these won’t be supporting any weight in the “Plan B” design, I just cut them to size and sanded, primed and painted.
The adjustable base I got sits about 1.5” lower than I originally wanted, and for whatever reason I can see the difference. The model I got is bare bones, and the legs aren’t adjustable, so I used the extra scraps from the rails to make 6 little blocks that go under the base’s legs to raise the entire platform up to be where I wanted it to be in the first place. I glued these up to make them 1.5” tall and used a 2” forstner bit to make a slight recess for the feet to rest in.
Problem solved!


